Accept payments on your website: set up a payment form for coaches, consultants & digital services
“Send me your requisites” is the #1 reason digital entrepreneurs lose sales.
Today’s clients don’t want to leave your website, search for your email, or wait for an invoice. They want to click “Pay Now” — and be done.
If you’re still manually sending payment links, you’re losing up to 60% of ready-to-buy customers.
The good news? You can start accepting payments directly on your site — in under 30 minutes, no developer needed, and zero coding — using FormDesigner.
In this guide, you’ll learn how to build a professional payment form for online courses, coaching sessions, consulting, or digital services — integrated with Stripe or PayPal.
Who Needs a Payment Form?
- Coaches & consultants selling 1:1 sessions or programs
- Course creators offering webinars, workshops, or memberships
- Freelancers in design, writing, development, or marketing
- Agencies collecting deposits or project fees
- SaaS founders testing early offers or one-time tools
Even if you sell just one service, a dedicated payment page builds trust, reduces friction, and increases conversions.
How It Works: Secure Payments via FormDesigner
Here’s the flow:
- Visitor lands on your offer page.
- They fill out a simple lead capture form (name, email, optional message).
- They click “Pay Now” → redirected to a secure Stripe or PayPal checkout.
- After payment, they see a thank-you page and receive a receipt.
- You get an instant notification (via Telegram, Google Sheets, or email).
Read also: How to receive website requests directly in Telegram: a complete guide to setting up a bot
🔒 Important: You never handle sensitive card data. Stripe and PayPal manage all PCI compliance — so you stay secure and legal.
Step 1: Choose Your Payment Provider
For global businesses, two providers stand out:
| Provider | Fees | Best For |
|---|---|---|
| Stripe | 2.9% + $0.30 per transaction | Global sellers, SaaS, recurring billing, custom branding |
| PayPal | 2.9% + $0.30 (varies by country) | Trust & familiarity, quick setup, buyers who prefer PayPal |
💡 Recommendation:
- Use Stripe if you want a seamless, branded checkout experience.
- Use PayPal if your audience trusts it (common in the US, EU, and Australia).
- Or enable both — FormDesigner supports multiple gateways!
Step 2: Build Your Payment Form in FormDesigner
FormDesigner makes it easy to create conversion-optimized payment flows:
- Native integration with Stripe and PayPal
- Create a quiz (“Which plan fits you?”) → redirect to relevant payment
- Build an online calculator (e.g., “Project cost: $X”) → pay deposit
- Mobile-optimized, spam-protected, and GDPR-ready
To create your form:
- Go to FormDesigner.
- Pick a “Payment Form” template or start from scratch.
- Add fields: name, email (required for receipts), optional message.
- Set your price:
- Fixed amount (e.g., $97 for a course), or
- Dynamic total (via online calculator logic).
- Go to Integrations → Payment terminal.
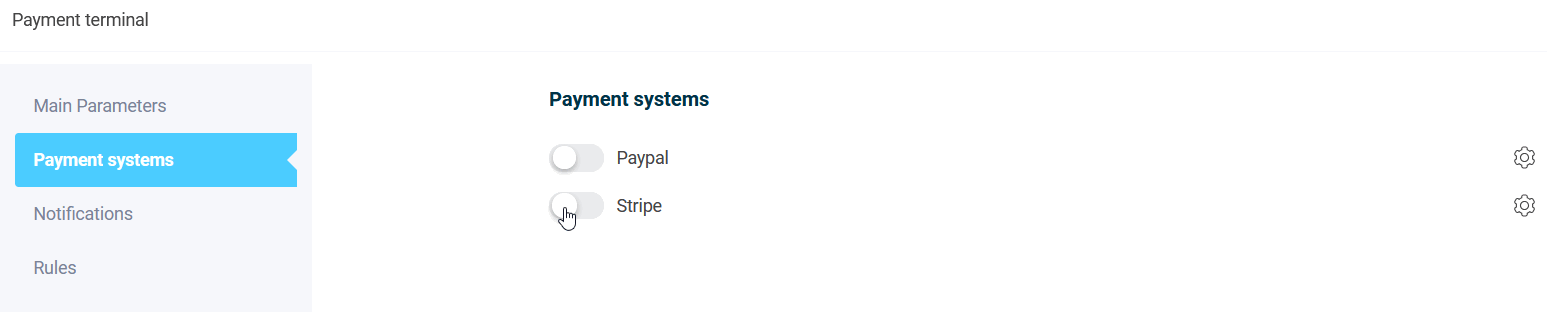
Step 3: Connect Stripe or PayPal
- Sign in to your Stripe Dashboard or PayPal Business account.
- Get your API keys (Stripe) or Client ID (PayPal) from settings.
- In FormDesigner:
- Select your provider,
- Paste the credentials,
- Set your “Success URL” (thank-you page).
- Enable automatic receipts (both platforms support this by default).
✅ Security note: FormDesigner transmits data over HTTPS. Your API keys are encrypted and never exposed publicly.
Step 4: Automate Order Notifications
Don’t miss a single sale. Set up real-time alerts:
Telegram
Connect @FormDesignerBot to get instant messages like:
💰 New Payment!
Client: Sarah Johnson
Email: [email protected]
Amount: $149
Service: “Brand Strategy Session”
Google Sheets
Log every order automatically: client name, email, amount, timestamp.
Receive a copy of each transaction — perfect for small teams.
Legal Compliance: Stay Safe & Professional
To accept payments legally:
- Include a clear service description (e.g., “60-min Marketing Consultation”).
- Collect email for receipts (required by most tax authorities).
- Add a checkbox: “I agree to the Terms of Service” with a link to your policy.
- Display your business name and contact info on the payment page.
Both Stripe and PayPal automatically generate compliant receipts — no extra setup needed.
Real-World Examples
- Business Coach: “Book a Strategy Call” → choose 30/60 min → pay via Stripe.
- Online Course: quiz → “You need the Premium Plan!” → PayPal checkout.
- Freelancer: online calculator for logo design → “Pay 50% Deposit” button.
- Digital Product: fixed-price PDF guide → one-click PayPal payment.
Common Mistakes (and How to Avoid Them)
| Mistake | Solution |
|---|---|
| ❌ No terms agreement | Add a mandatory checkbox with a link to your ToS |
| ❌ Missing email field | Email is required for receipts and follow-ups |
| ❌ Too many form fields | Keep it minimal: name + email + optional note |
| ❌ Skipping test payments | Always test in sandbox mode first! |
| ❌ No notifications | Connect Telegram or Google Sheets — never miss a sale |
Conclusion: Start Accepting Payments Today
You don’t need a full e-commerce store to sell online. You just need one smart payment form.
With FormDesigner, you can:
- Turn visitors into paying customers instantly,
- Stay compliant and secure,
- Save hours on manual invoicing,
- Deliver a professional buyer experience.
👉 Try it free:
Create your first payment form with Stripe or PayPal in FormDesigner — no code, no risk, ready in 30 minutes.
Bonus: Quick Checklist
- ✅ Sign up for Stripe or PayPal Business
- ✅ Create a form in FormDesigner
- ✅ Connect your payment gateway
- ✅ Add Terms of Service checkbox
- ✅ Enable Telegram or Google Sheets notifications
P.S. Need a ready-made template? FormDesigner includes pre-built payment forms for coaches, courses, and freelancers — just customize and go live!